Search Knowledge Base by Keyword
This KB documentation is using Advanced Search, Links Editor and Elegant Layouts add-ons.
Step 1 – Setup AI Provider and AI Key
Decide which AI provider you want to use, then follow the steps below to get the API key.
Why Gemini is the default
Gemini is the default AI provider because our internal testing shows it responds faster in most scenarios.
You are not locked into Gemini. You can switch to OpenAI at any time if you prefer or already use ChatGPT.
Both providers are fully supported and deliver the same features, only the AI provider and API key differ.
After choosing a provider, continue to that provider’s Step 1 to set up your API key.
A) Set Up Your Gemini API Key
⚠️ Known Issue: New Google Gemini API Keys (May 2026)
What’s happening
Google recently changed the format of API keys generated in Google AI Studio. New keys start with AQ. instead of the older AIzaSy... format.
Unfortunately, these new AQ. keys have a bug on Google’s end that causes file uploads to fail when syncing your knowledge base. This is not a problem with Echo Knowledge Base, it is a confirmed issue with Google’s own API, reported by multiple developers across different tools and platforms.
We are actively monitoring Google’s progress on a fix and will update the plugin as soon as a reliable solution is available. We are continuing to investigate and will ship a fix in a plugin update the moment a reliable solution exists
Who is affected
You are affected if all of the following are true:
- You created your Gemini API key in Google AI Studio after mid-April 2026
- Your key starts with
AQ. - You are seeing sync errors when uploading articles to your knowledge base
If your key starts with AIzaSy..., you are not affected and everything should work normally.
Questions?
If you’re unsure whether you’re affected, or you’d like to check in on the status of this issue, feel free to reach out to our support team, we’re happy to help.
Follow the steps below to create your Gemini API key and connect it to your Knowledge Base.
1. Sign in (or create an account)
Go to: https://aistudio.google.com
Sign in with your Google account. If you’re new, accept the terms to enable API access.
2. Create an API Key
- In the left sidebar, click API Keys.
- Click Create API Key (top-right corner).
- Enter a name for your key.
- Choose an existing project or create a new one.
- Click Create Key.
- Find your project, and under the Key column, click on your new key.
- Copy the key from the popup.
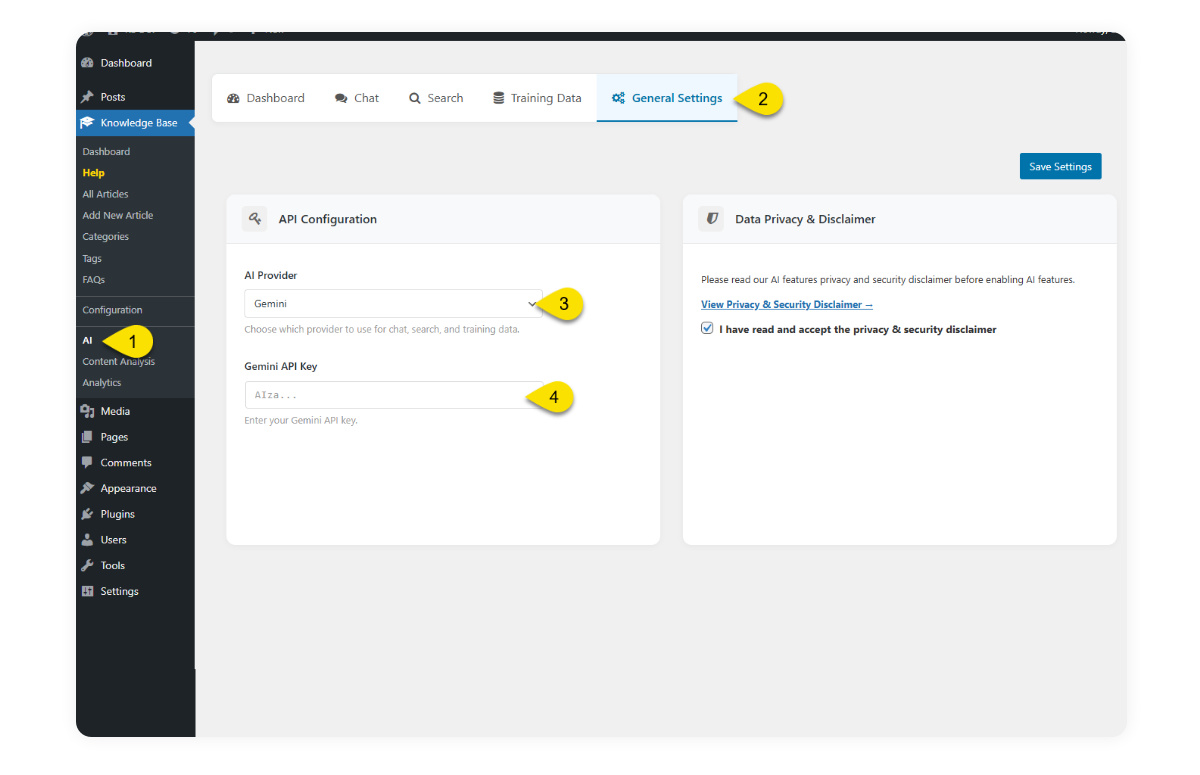
3. Add Your Gemini API Key to the Knowledge Base
- In WordPress, open Knowledge Base → AI Page.
- Select the General Settings tab.
- In API Configurations, paste your Gemini API key.
- Check the disclaimer box.
- Click Save.
B) Set Up Your OpenAI (ChatGPT) API Key
Before using the AI features in your Knowledge Base, please ensure your OpenAI account has sufficient credit.
How to add credit
- Log in to your OpenAI account.
- Click the Settings icon (gear icon) in the top-right corner of the dashboard.
- In the sidebar menu, select Billing.
- From the Billing page, you can:
- Add credit to your account balance
- Enable auto-recharge
- Manage your payment methods
1. Sign in (or sign up)
- Go to https://platform.openai.com.
- If you’re new, complete the email (and one‑time phone) verification.
2. Create a Project (recommended)
OpenAI now organizes API keys under Projects, which offer better separation, usage tracking, and billing controls.
- In the top-left corner of the OpenAI dashboard, click the current project name.
- Select Create project.
- Enter a short, descriptive name (e.g., Website Name or Website Name KB ).
- Click Create to finalize.
💡 Tip: Projects have their own usage, budgets, and keys. Creating a dedicated Project for your Knowledge Base helps keep cost and access management organized. Learn more about Projects
3. Create your API Key
- Click on Dashboard in the top menu.
- Open the API Keys page in the left sidebar menu. Or use this direct link:: https://platform.openai.com/api-keys
- Make sure the correct Project is selected. If not, the key will be created under your Default Project.
- Click + Create new secret key (top-right button).
- Fill in the details:
- Name: Something short and descriptive (e.g., WebsiteName-KB).
- Project: Select the Project you just created.
- Permissions: Leave on All for full access.
- Click Create secret key to confirm.
4. Copy and store it immediately
The full key appears once in a grey popup box. Click Copy and paste it into a password manager or save it on your computer. After you close the dialog you’ll never be able to view the complete key again only revoke or replace it
5. Add your key to Knowledge Base
- In WordPress admin, open Knowledge Base → AI Page.
- Select the General Settings tab.
- In the API Configurations. Paste your OpenAI API key.
- Read the disclaimer, then check the disclaimer box.
- Click Save.
6. Add Training data
Follow this link to continue with the AI setup: https://www.echoknowledgebase.com/documentation/ai-training-data-teach-it-your-business/